novityinfo
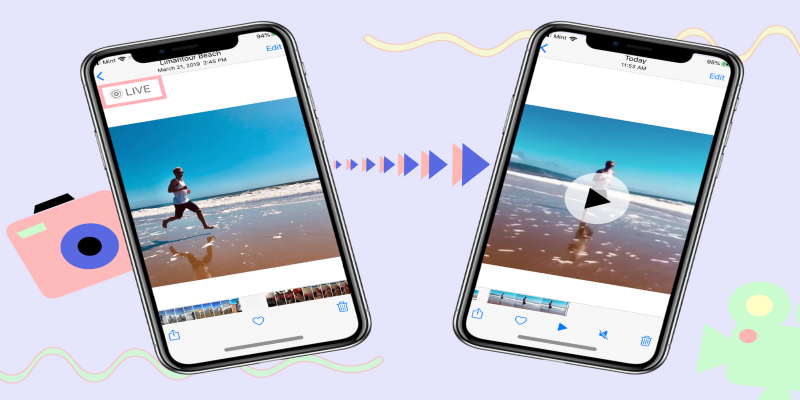
Turn iPhone Live Photos into Shareable Videos
Advertisement
Live Photos are one of those small iPhone features that often go unnoticed—until you realize how useful they can be. They capture a moment just before and after you hit the shutter, turning what would be a still image into a short clip. It’s like getting a sneak peek of what was happening just outside the frame. But here’s the thing: Live Photos don’t always play nicely across all platforms. Sending them to someone who doesn’t use Apple devices? The "live" part disappears. That’s where converting them to video helps. It’s quick, simple, and allows you to keep the full experience intact—movement, sound, and all.
This conversion makes sharing across apps and devices more consistent and less frustrating. Whether it's a family memory or a travel snap, it's better when you can send it as a full video instead of a muted still.
How to Make a Live Photo into a Video Easily?
Using an iPhone
Apple actually made this pretty simple. You don’t need any third-party apps or complicated steps. Here’s how:
- Open the Photos app.
- Go to your Live Photo.
- Tap the Share icon (that little box with the arrow pointing up).
- Scroll down and choose Save as Video.
And that’s it. Your iPhone saves the clip right into your camera roll, right next to your original Live Photo. The audio comes with it, and you’re free to send or post it anywhere.
Using Shortcuts App for Batch Conversion
If you’ve got more than one Live Photo to convert and don’t want to go through them one by one, the Shortcuts app might help. It’s already installed on most newer iPhones, and there are community-made shortcuts you can add to speed things up.
For example, you can find a shortcut named “Convert Live Photos to Video,” which, as the name suggests, handles the job in batches. Once added:
- Open the Shortcuts app.
- Run the shortcut.
- Pick the Live Photos you want.
- Let the shortcut process and save the video versions to your camera roll.
No coding, no fuss. It’s a handy trick if you’re organizing a bunch of photos from a trip or an event.
Using Third-Party Apps. But Only If You Need Extras
There are apps on the App Store that offer more features than the built-in method. Things like trimming, adding filters, or combining several Live Photos into one longer video. Here are a few that people find useful:
Lively: This app not only converts Live Photos to videos but also gives you the option to turn them into GIFs. If you want to make your Live Photos more dynamic and shareable, Lively allows you to adjust the frame rate for smoother playback and even save the GIF directly to your camera roll.
IntoLive: Originally designed to convert videos into Live Photos, IntoLive reverses this by turning Live Photos into videos. You can add custom effects and even set the length of the video, making it a great choice for people who want to add a creative twist to their clips.
Motion Stills (by Google): This app stabilizes your Live Photos and gives you simple editing tools. It’s especially handy if you’ve taken a Live Photo with a bit of camera shake—Motion Stills helps smooth it out and enhances the overall quality before you share it.
However, if all you need is a straight conversion, the Photos app or Shortcuts method is the simplest route. These apps are better suited when you’re looking to add some flair.
Using an iPad or a Mac
The steps on iPads are nearly identical to those on iPhones. Just open the Live Photo, tap Share, and choose "Save as Video." On a Mac, things are a little more roundabout if you're using macOS Catalina or later; your Live Photos sync with the Photos app on your Mac.
To convert them on Mac:
- Open the Photos app.
- Find the Live Photo.
- Right-click and choose Export > Export Unmodified Original.
This gives you two files: a .jpg and a .mov. The .mov is the short video portion of your Live Photo. You can use that directly, or open it in iMovie or QuickTime if you want to make edits before saving or sharing.
Sharing the Final Video
Once you have the video version, sharing becomes a lot easier. You can upload it to social media, attach it to emails, or back it up to cloud storage—all without worrying that the motion or sound will get lost. It behaves like any other video file.
Tip: If you’re sending it via messaging apps that compress video (like WhatsApp), try sending it as a file attachment instead of through the gallery. That way, the quality holds up better.
What If It Doesn’t Work?
Sometimes, you may run into a Live Photo that doesn't offer the "Save as Video" option. That usually means it wasn't taken as a true Live Photo, or it was edited in a way that removed the motion component. One quick check: swipe up on the photo. If you don't see "Live Photo Effects" like Loop, Bounce, or Long Exposure, then it's probably no longer a Live Photo. In that case, no conversion is possible.
Final Thoughts
To sum up, converting Live Photos to videos is an easy process that ensures your moments are shared as they were meant to be—full of life, motion, and sound. Whether you're using the built-in options like the Photos app or Shortcuts for a quick conversion, or taking advantage of third-party apps like iMovie, Lively, or IntoLive for more customization, there's a method to suit your needs. No matter how you choose to do it, transforming your Live Photos into videos lets you preserve those precious memories in a way that’s easy to share and enjoy. So go ahead, try it out, and relive your favorite moments in motion!
Advertisement
Related Articles

Best Business Banking Tools to Simplify Finance in 2025

WPForms vs. Gravity Forms: Which WordPress Form Plugin Is Best for 2025
How to Use Camtasia for Screen Recording
7 Simple Ways to Make MTS Files Work on Your iPhone
Transfer Your Homemade DVDs to Apple Devices
Best Software to Build Guided Product Tours

Great iMovie Replacements for PC with Smart Editing Features
Notion vs. OneNote: Which Note-Taking App Should You Use in 2025
Learn How to Rotate Videos in iMovie for Both Mac and iOS Devices

How to Make a Timeline in Google Docs for Your Next Project: A Guide
Edit Videos for Free: Using Blender and Other Top Alternatives