novityinfo
Learn How to Rotate Videos in iMovie for Both Mac and iOS Devices
Advertisement
Whether you're putting together a quick home video or editing a clip for a presentation, orientation matters, it can be frustrating to realize your video was recorded sideways or upside down, especially after you've already imported it into your editor. The good news? If you’re using iMovie, fixing that is straightforward. iMovie gives you just what you need to rotate your footage without dragging you through too many steps.
Let’s walk through everything you should know about rotating a video in iMovie—on both Mac and iOS devices—so you can get it right without running in circles.
Why Rotation Matters Before You Even Begin Editing
Sometimes the issue starts right at the point of recording. Maybe the phone was tilted, or a camera was mounted incorrectly. If you’re viewing the video on your desktop and it looks off—maybe the sky is where the floor should be—rotation can fix the visual confusion. But it’s not just about correcting mistakes. Rotation is also used for creative framing. Sometimes, flipping a clip gives it a more dynamic look or better aligns it with other footage in the sequence.

It can also help maintain consistency in visual flow when combining clips from different sources. In some cases, changing the orientation can even shift the mood or focus of a scene.
Rotating Video in iMovie on Mac
iMovie on Mac has a clean interface, which helps make quick edits without unnecessary fluff. To rotate a video, you won’t need plugins or extra tools—just a few clicks.
To begin, launch iMovie, click on Create New, and then choose Movie. This opens the project window where you'll work. Click the Import Media button, locate your video file, select it, and hit Import Selected. Your clip will now appear in the media library.
Next, grab the video from the media library and drop it into the timeline at the bottom of the screen. This is where the editing happens. Once the video is in the timeline, click on the clip to select it. That tells iMovie which piece of footage you’re working with.
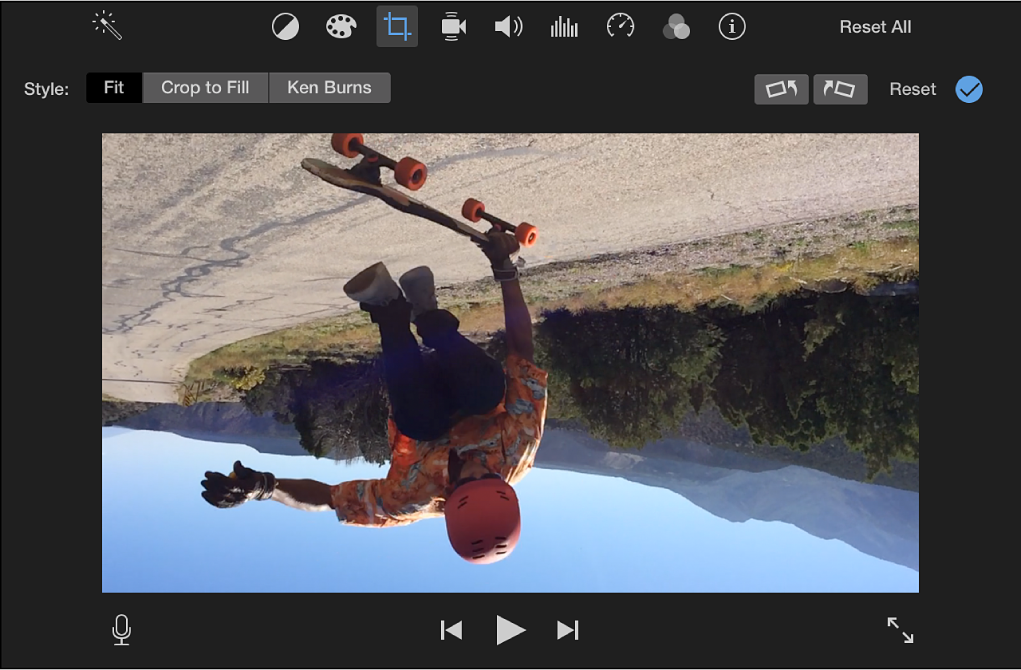
Now look above the video preview where you'll see a toolbar. Click the Crop to Fill or Fit button, which will show the rotation options. You'll see two small rotating icons, shaped like curved arrows, pointing left and right. Clicking on one of these will rotate your video 90 degrees in that direction. You can click more than once if needed to get the orientation right.
Check the preview window to see if the rotation looks correct. If not, simply click the rotate icon again until it looks the way you want. Once everything looks right, go to the top-right corner, click the Share icon, and choose File. Pick your preferred resolution and save location, then click Next to export your video.
That’s all there is to it. No filters, no complications—just a direct path from a wrong-angle video to one that looks the way it should.
Rotating Video in iMovie on iPhone or iPad
If you're using iMovie on an iPhone or iPad, the process is just as simple, though the controls are based on touch. Start by tapping on the iMovie app, then hit Create Project and choose Movie. From your camera roll, pick the video you want to rotate and tap Create Movie to bring it into the timeline.
Once it's there, tap on the video clip to activate the editing options. To rotate the video, place two fingers on the video preview and twist them in the direction you want to rotate the video. Each twist rotates the video 90 degrees, and you can repeat the gesture to keep rotating as needed. You can rotate either clockwise or counterclockwise, depending on how you move your fingers.
Check the orientation by watching the preview. As long as the video looks right, you’re done with this step—there’s no need to press any confirm or apply button; iMovie saves the change automatically. When you’re ready to export the video, tap Done in the upper-left corner. Then tap the Share button, select Save Video, and pick the quality you want. The rotated video will be saved directly to your Photos app. You won’t need any extra tools or to dig through hidden settings—just a simple twist with two fingers and your video is corrected.
Limitations You Should Know About
While iMovie handles basic rotation cleanly, it doesn't offer free-angle rotation. Everything is done in 90-degree increments. That works for fixing vertical or upside-down clips, but won't help if your video needs a slight tilt correction (like 15 or 45 degrees). For that, you'd need more advanced software like Final Cut Pro or Adobe Premiere.
Another point: iMovie doesn't auto-correct orientation based on metadata. If your phone marks a video as landscape, but you hold it as portrait, iMovie won't guess or fix it for you. You'll still need to rotate it manually.
Lastly, iMovie on iOS doesn’t offer a visible rotate button. If you're new to the app, it’s easy to miss the two-finger twist gesture. Keep that in mind if your first instinct is to look for a toolbar—it won’t be there.
Final Thoughts
Rotating a video in iMovie isn't something most people think about until they need it, but once it comes up, it helps to know you're not stuck. Whether you're correcting a clip that was filmed at the wrong angle or experimenting with a more creative layout, iMovie handles basic rotation with ease. You don't need extra tools, and the steps are quick enough that even beginners won't feel lost. What matters is that your final video feels natural to watch. With just a few simple actions—on Mac or iOS—you can fix the orientation and keep editing without interruption. That small adjustment often makes a big difference in how your video is received.
Advertisement
Related Articles

How to Use Camtasia for Screen Recording

Google Ads vs. Facebook Ads: Which is Best for Your Business in 2025

Turn iPhone Live Photos into Shareable Videos

How to Make a Timeline in Google Docs for Your Next Project: A Guide

How to Automatically Answer Form Responses with ChatGPT: A Step-by-Step Guide

Understanding the Differences Between Claude and ChatGPT in 2025
Notion vs. OneNote: Which Note-Taking App Should You Use in 2025
AVS Video Editor: What It Does Well and What Others Do Better

Great iMovie Replacements for PC with Smart Editing Features

Best Business Banking Tools to Simplify Finance in 2025

10 Songs That Make Graduation and Wedding Slideshows Stand Out